Tired of watching download progress bars crawl at a snail’s pace? We’ve all been there. If you’re a Firefox user, you’re just a few steps away from supercharging your downloads. Say hello to the Internet Download Manager (IDM) Integration Module, the key to unlocking incredibly fast and efficient file downloads right within your favorite browser.
This guide is your one-stop shop for seamlessly integrating IDM with Firefox. We’ll walk you through two foolproof methods, share some expert tips, and answer all your burning questions. Get ready to transform your download experience from a chore into a breeze!

First Things First: A Quick Pre-Flight Check
Before we dive in, let’s make sure you’re set up for success. For a smooth integration, it’s crucial that you are using the latest versions of both Firefox and Internet Download Manager. A quick check for updates now can save you from potential headaches later!
Two Easy Ways to Install the IDM Extension in Firefox
We’ll cover two distinct methods to get IDM running on Firefox. The first is a manual method perfect for troubleshooting, and the second is a direct installation from the Firefox Add-ons store. Both work perfectly, so you can choose whichever you prefer.
Method 1: Manual Installation via the IDM Folder (Using the .XPI File)
This method involves manually adding the IDM extension file directly to Firefox. It’s a great way to ensure you’re installing the correct version that came with your IDM software. If you’d like to use this method, you can grab the necessary file below.
Step-by-Step Guide:
-
- Open your Mozilla Firefox browser.
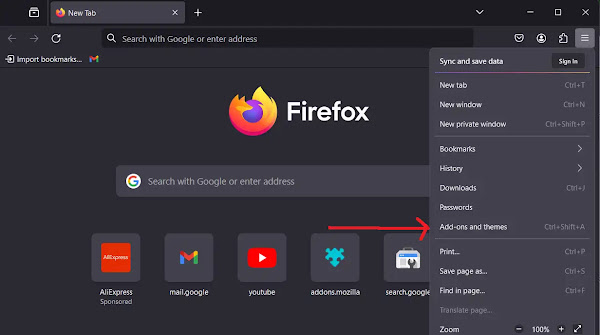
- Click the menu icon (☰) in the top-right corner. From the dropdown, select Add-ons and Themes.
-
- On the Add-ons Manager page, click Extensions on the left-hand sidebar.
- Click the gear icon and choose Install Add-on from File….

-
- Your file explorer will open. Navigate to the installation directory for Internet Download Manager. This is usually located at:
C:\Program Files (x86)\Internet Download Manager - Inside this folder, locate the file named idmmzcc3.xpi and click Open.
- Your file explorer will open. Navigate to the installation directory for Internet Download Manager. This is usually located at:

-
- A confirmation pop-up will appear. Click the Add button to grant permission.

-
- You’ll see a success message! You’ve now installed the extension.

-
- Final Step: Find the “IDM Integration Module” in your extensions list, click the three-dots menu (…) next to it, and select Manage.

-
- Ensure that the toggle next to Run in Private Windows is set to Allow if you want to use IDM in private browsing mode.

That’s it! You’ve successfully integrated IDM manually.
Pro-Tip: Can’t Find the .XPI File?
If you navigate to the IDM folder and the idmmzcc3.xpi file is missing, it’s a strong sign that your IDM installation is either incomplete or outdated. The best solution is to download and install the latest version of IDM directly from the official website. This will ensure all necessary files, including the browser integration modules, are present.
Method 2: Quick Install from the Official Firefox Add-Ons Store
For maximum simplicity and security, you can install the extension directly from Mozilla’s official repository.
-
- Open Firefox and go directly to the official IDM extension page: IDM Integration Module on Firefox Add-Ons.
- Look for the big blue button that says + Add to Firefox and click it.

-
- A small window will pop up asking for permission. Click Add to continue.
- You’re all set! A confirmation will appear, and IDM is now ready to handle your Firefox downloads.
Pro-Tip: Safety First!
The Firefox Add-Ons Store is the safest source for extensions. Before installing, always double-check that the extension is offered by “Tonec Inc.” to ensure you’re getting the official, secure version. Reading recent reviews can also give you a good idea of its current performance.
Frequently Asked Questions (FAQ)
How do I make IDM the default downloader in Firefox?
Once the IDM Integration Module is installed and enabled, it should automatically become the default download manager. If Firefox’s built-in downloader is still handling downloads, check the following:
- Open IDM: Launch the main IDM application. Go to Downloads > Options.
- Check Browser Integration: In the “General” tab, ensure the box next to “Mozilla Firefox” is checked. If it’s already checked, try un-checking it, clicking OK, then re-opening the options and checking it again. This can often reset the connection.
- Restart: Close both Firefox and IDM completely, then reopen them.
How can I stop IDM from downloading videos as MKV and get MP4 instead?
Many streaming sites now serve video in MKV format by default. If you prefer MP4, you can tell IDM to ignore the MKV format, often prompting the site to offer an MP4 alternative.

- Open IDM Options: In the IDM application, go to Downloads > Options.
- Go to File Types: Select the “File Types” tab.
- Remove MKV: In the top box (Automatically start downloading the following file types), find and delete MKV from the list.
- Click OK: Save your changes. Now, when you try to download a video, IDM will no longer automatically grab the MKV file, and you should see other format options like MP4.
What should I do if the IDM extension is not working in Firefox?
If the integration seems broken, don’t worry! This is a common issue with a few simple fixes. Work through this checklist:
- Update Everything: Make sure both IDM and Firefox are fully updated to their latest versions. This solves the problem 90% of the time.
- Re-enable Integration: Open IDM > Options > General. Uncheck “Mozilla Firefox,” click OK, then go back and re-check it.
- Check Extension Status: In Firefox, go to Add-ons and Themes > Extensions. Make sure the IDM Integration Module is enabled. If it shows an error like “corrupted,” remove it and reinstall it using one of the methods above.
- Run as Admin: Try closing Firefox and running the IDM application as an administrator (right-click > Run as administrator). This can sometimes help it properly hook into the browser.